Never write CRUD code again – database agnostic Data Access Layer
Introduction
Imagine a tool that wrote all your CREATE, READ, UPDATE, DELETE (tool that writes CRUD) statements for you. Imagine that this tool that writes CRUD was smart enough to look at the relational model of your database, figure out each table’s definition and automatically generate the correct SQL statements to deal with data (the DDLs). The Data Access Layer described in this post is based on Linq to Sql and requires .Net 3.5 (or above) to run. In this post, we will learn how to use this generic data access layer (generic DAL) within any application (web or desktop). The particular application shown in this post is called WAWSample.
Prerequisites
To get started with our CRUD writing (more appropriately CRUD creating tool), we need the Generic Data Access Library (or Generic DAL) – which can be downloaded here. In addition to the Generic DAL, we need two other components :
- A class library wrapping up the usage of the Generic DAL (this is the DAL customized to our application – let us call this WAWDataLayer)
- A web application (sample application) that will use the class library (that wraps the generic DAL). In our example, we work with a Website called WAWSample.
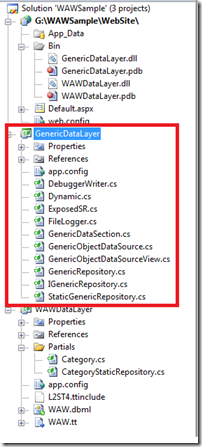
Extract the files that have been downloaded from the link provided in Prerequisite section, You will get a GenericDataLayer.sln file under MultiTierLinqToSql_2.1\MultiTierLinqToSql_2.1\GenericDataLayer, double click to open it, you will see something like the highlighted section below:
Step-1 – Include the Generic DAL in your project
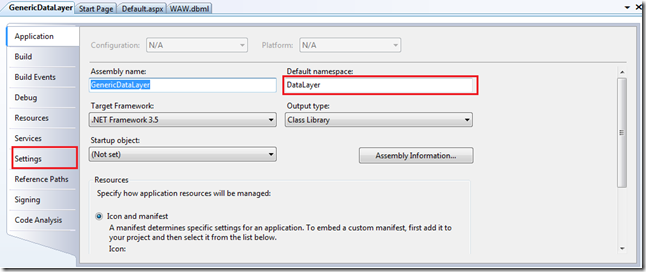
Create a class library project name it as GenericDataLayer as shown in the above image, paste all the files from MultiTierLinqToSql_2.1\MultiTierLinqToSql_2.1\GenericDataLayer\GenericDataLayer folder which you have downloaded from the prerequisite section. The list of files to be included is shown in the highlighted section above. Right click on GenericDataLayer project in solution explorer and select properties, rename the default namespace to DataLayer and then click on the settings tab
Step 2 – Connect to your database
On clicking Settings tab, you need to add a ConnectionString which will point to our database as shown in the figure
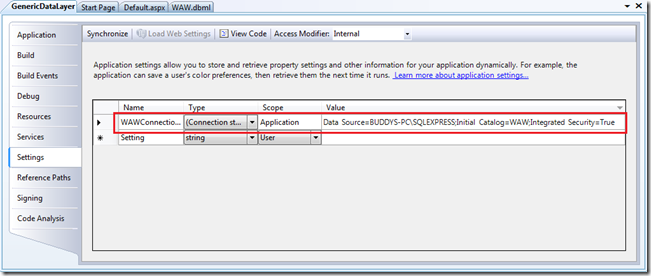
Provide a Name – for example WAWConnectionString and select ConnectionString as Type from the DropDown uder Type Header,Scope will be Application and value will be datasource pointing to our database.This setting automatically gets written in the app.config file of GenericDataLayer project
<?xml version="1.0" encoding="utf-8" ?>
<configuration>
    <configSections>
    </configSections>
    <connectionStrings>
        <add name="DataLayer.Properties.Settings.WAWConnectionString"
            connectionString="Data Source=MY-PC\SQLEXPRESS;Initial Catalog=WAW;Integrated Security=True"
            providerName="System.Data.SqlClient" />
    </connectionStrings>
</configuration>
We are done with the GenericDataLayer project. Select GenericDataLayer from Solution Explorer and right click choose Build.
Step 3 – Create your customized DataAccessLayer that utilizes Generic DAL.
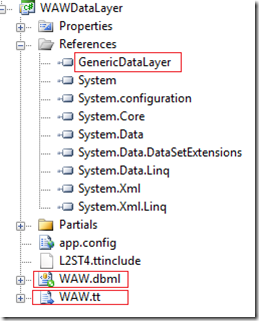
a) Create another class library project name it as WAWDataLayer , this will refer the GenericDataLayer and this will contain all the files which will generate CRUD statements. Add a reference to GenericDataLayer project as shown in the image below
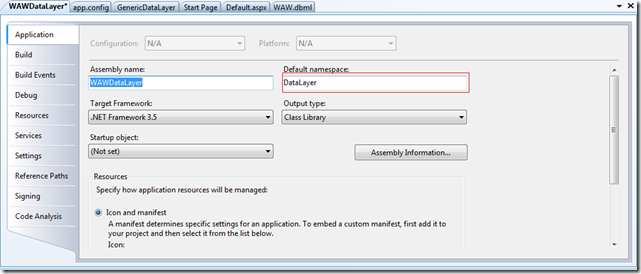
Right click on WAWDataLayer in the solution explorer and select properties. Rename the default namespace to DataLayer and then click on Settings Tab
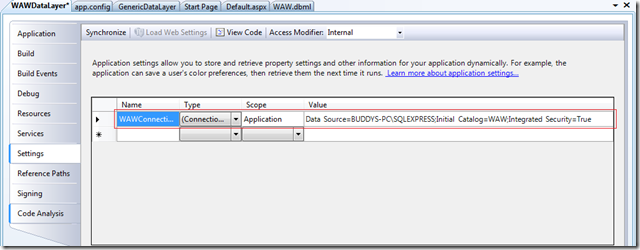
b) Connection String for your customized DAL : On clicking Settings tab, you need to add a ConnectionString which will point to our database as shown in the figure:
Provide a Name –for example WAWConnectionString and select ConnectionString as Type from the DropDown uder Type Header,Scope will be Application and value will be datasource pointing to our database.
This setting automatically gets written in the app.config file of WAWDataLayer project
<?xml version="1.0" encoding="utf-8" ?>
<configuration>
    <configSections>
    </configSections>
    <connectionStrings>
        <add name="DataLayer.Properties.Settings.WAWConnectionString"
            connectionString="Data Source=MY-PC\SQLEXPRESS;Initial Catalog=WAW;Integrated Security=True"
            providerName="System.Data.SqlClient" />
    </connectionStrings>
</configuration>
c) Generate the DBML (mapping files) for your database.
- Copy two files L2ST4.ttinclude and DataClasses.tt from MultiTierLinqToSql_2.1\MultiTierLinqToSql_2.1\GenericDataLayer\NorthWindDataLayer folder which you have downloaded from the prerequisite section.
- Create a dbml file name it as WAW.dbml as our database name is WAW and then select this dbml file in the solution explorer and right click and choose properties and keep CustomTool property blank. and delete WAW.designer.cs file as well, after this rename DataClasses,.tt to WAW.tt,.
A sample of WAW.dbml is shown in the image
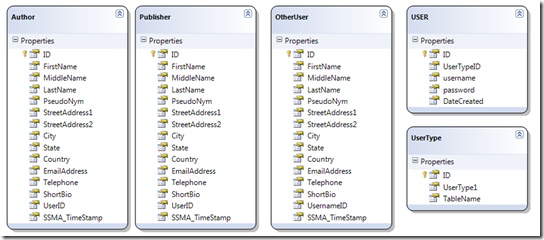
Now right click WAW.tt and select Run Custom Tool, it should generate a class file WAW.generated.cs, since this T4 template references DataLayer as default namespace that’s why we renamed the namespaces of GenericDataLayer and WAWDataLayer to DataLayer.
- That’s all we need to do in WAWDataLayer, select WAWDataLayer from Solution Explorer then Right Click and choose build.
Step-3 – Incorporate the customized DAL and Generic DAL into your web application (We will bind the datasource to a DataGrid in our application)
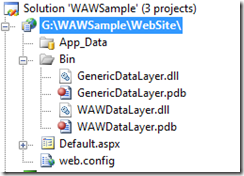
Create a sample website and name it WAWSample then add reference to GenericDataLayer and WAWDataLayer as shown in the figure.
- Web.Config entries: GenericDataLayer section, Connection string and log file
<configSections>
<section name=“GenericDataSection” type=“DataLayer.Generic.GenericDataSection, GenericDataLayer”
allowDefinition=“MachineToApplication” restartOnExternalChanges=“true” requirePermission=“false“/>
</configSections>
<GenericDataSection LogType=“file” LogFile=“mylog.txt” DeleteExistingFile=“true“/>
<connectionStrings>
<add name=“WAWConnectionString”
connectionString=“Data Source=MY-PC\SQLEXPRESS;Initial Catalog=WAW;Integrated Security=True”
providerName=“System.Data.SqlClient“/>
</connectionStrings>The configsection will conatin an entry for GenericDataSection as shown in the above snippet. The GenericDataSection can be used to specify the Log file location as shown in the code snippet.
Don’t forget to specify the connection String.
- Once you are through with these settings we need to create a Sample Page which will display data from the database using GenericDataLayer.
- Open Default.aspx in design mode and place a GenericObjectDataSource (from your Toolbox) and GridView to display data and a FormView to Insert Data.

Drag and Drop GenericObjectDataSource from toolbox onto the form as shown in the figure.
<%@ Register assembly=”GenericDataLayer” namespace=”DataLayer.Generic” tagprefix=”DataLayer” %><DataLayer:GenericObjectDataSource ID="CategoryDataSource" runat="server" DataObjectTypeName="DataLayer.Category" TypeName="DataLayer.CategoryStaticRepository" /> <asp:GridView ID="grdCategory" runat="server" DataKeyNames="Id" AllowSorting="true" AutoGenerateColumns="False" DataSourceID="CategoryDataSource"> <Columns> <asp:BoundField DataField="ID" HeaderText="CategoryID" SortExpression="ID" /> <asp:BoundField DataField="CategoryName" HeaderText="CategoryName" SortExpression="CategoryName" /> <asp:CommandField ShowEditButton="True" /> <asp:CommandField ShowDeleteButton="true" /> </Columns> </asp:GridView> <asp:FormView ID="CategoryFormView" runat="server" DataSourceID="CategoryDataSource" DataKeyNames="ID"
DefaultMode="Insert"> <InsertItemTemplate> <asp:Label ID="CategoryNameLabel" runat="server" Text="CategoryName:"
AssociatedControlID="CategoryNameTextBox"/> <asp:TextBox ID="CategoryNameTextBox" runat="server" Text='<%# Bind("CategoryName") %>' /> <br /> <asp:LinkButton ID="InsertButton" runat="server" CausesValidation="True" CommandName="Insert" Text="Insert" /> <asp:LinkButton ID="InsertCancelButton" runat="server" CausesValidation="False" CommandName="Cancel" Text="Cancel" /> </InsertItemTemplate> </asp:FormView>
- The above code snippet shows the CategoryDataSource that we have dragged from toolbox. The one property that we specified for this datasource was DataObjectTypeName (specified as DataLayer.Category which means that this DataSource will read and write data to/from Categories Table of our WAW Database).
- Notice the FormView uses the CategoryDataSource defined directly above (which is set to use our Custom DAL).
- In our GenericDataLayer library each database entity has an associated repository class which is used to perform common CRUD operations. Specific entity repositories inherit from a generic class GenericRepository which already implements all the basic Select, Insert, Update & Delete operations.
- Since we are going to add and show data from the Categories Table, a CategoryRepository class can be found in our WAW.generate.cs file under WAWDataLayer.
- TypeName is specified as DataLayer.CategoryStaticRepository, the GenericDataLayer makes use of Generics which provides a feature where I don’t need to add any code at all into my CategoryRepository to get all the standard CRUD operations in a fully type safe way. My CategoryRepository class can now be customised to add additional data access methods which are specific to Categories, for instance GetByCategoryId().
- There is also a class GenericStaticRepository which allows you to use this functionality in a static way. So in the example above, rather than instantiating a CategoryRepository, we could simply do this: IList<Category> categories= CategoryStaticRepository.SelectAll();
- Similarly, the DataSourceID of GridView and FormView needs to be set to CategoryDataSource as shown in the code snippet above.
That’s all we needed to make our customized data access layer work with our website.
Running the project (Running the CRUD creation / CRUD Writing Tool)
When we run the website above (launch default.aspx), we will see the data from the Category table being bound to the GridView. INSERTS, DELETES etc. are all automatically handled – since they reference the same datasource (CategoryDataSource).
Schema changes
An obvious question is – what happens if we need to change the schema? Do we have to redo all of the above? The answer is NO. The only thing we need to regenerate are the DBML files (the mapping files) – and these are easily generated using the T4 templates above (L2ST4.ttinclude and DataClasses.tt). In other words, there is a minimal time cost associated with a changing schema – somewhat of an exception when it comes to ORM layers/database mapping files.
Conclusion
All the CRUD statements (for our underlying WAW database) were generated for us – by our CRUD tool – in no time. Best of all, when the schema changes, we do not have to change any SQL statements (schema definitions are maintained in the mapping files for us – which are easily regenerated). This Generic Data Access Layer (CRUD creation tool) works the same way whether you are building desktop apps or web apps. Further reading on the Generic Data Access Layer can be found here .
Leave a Reply