AWS VPN Connection – Customer Side Info Required and Approximate Costs
What is the end goal?
The idea is to be able to address your cloud instances (EC2 instances) using their private IP addresses, as opposed to their public IPs. This provides an additional layer of security. The traffic between your data center and the AWS VPC is IPSec encrypted.
Subnets and Route Tables Pre Requisites
It is best to have a ‘Shared Services’ Subnet. This will need to be a PRIVATE subnet. To make this subnet PRIVATE, create a NEW ROUTING Table, called PRIVATE-ROUTING-TABLE. Add a ROUTE (Destination 0.0.0.0/0 to go to the NAT Gateway. Create a NAT GW if you don’t have one already). Do the same and create a separate, PUBLIC-ROUTING-TABLE, which has a route to the internet (it should look identical to your default routing table).
Associate the SHARED SERVICES subnet with your PRIVATE ROUTING table. Now, when we finally have our Site to Site VPN up and running, we can add another route to this PRIVATE-ROUTING-TABLE. That route will be targeting (destination On Prem CIDR block). And the next hop on the route should be the Site to Site VPN.
VPN Connection (Site to Site VPN in AWS) Basics
- Typically leverages BGP over IPSec.
- Comes with a redundant Tunnel – i.e. Two Tunnels per VPN Connection
VPC Pre Requisites
You will need an AWS VgW (Virtual Gateway) and an Internet Gateway (IgW) already setup in order to create your VPN Connection.
It is important to realize that both these Gateways belong to the VPC itself – and are not associated with any subnet (take with a grain of salt the statement that ‘all resources must belong to a subnet’. Network resources can belong to a VPC, without belonging to a subnet).
Needed for VPN Tunnel Setup – Customer Data Center Info
- Name of VPN Connection (e.g. CustomerName-PROD-VPN)
- Local IPv4 Network Cidr – Customer CIDR range
- Tunnel Inside Ip Version (Default IPv4)
- Pre-Shared Keys for VPN Tunnels (Unspecified tunnel keys will be randomly generated by Amazon)
- Cisco Router Type and Latest Upgraded Software Version
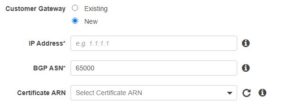
- Customer Gateway Info (See Screenshot below)
– IP Address (Public IP of Cisco Router)
– BGP ASN (The Border Gateway Protocol (BGP) Autonomous System Number (ASN) of your customer gateway. You can use an existing ASN assigned to your network. If you don’t have one, you can use a private ASN in the 64512-65534 range.)
Needed on AWS Side
About $1 / day for just the ‘up and running’ active piece
AWS Site-to-Site VPN connection fee: You will be charged for your AWS Site-to-Site VPN connection on an hourly basis, for each hour the connection is active. For this AWS Region, the rate is $0.05 per hour.
- Data transfer out fee: Your first GB is free, you will be charged for 499 GB at $0.09 per GB. This will result in a charge of $44.91.
- 1 TB will cost $100 (transfer costs)
- Monthly up and running cost = $30/mo.
Configuration File for the Customer Router (e.g. Cisco Router)
You will need to download the router configuration (this contains the shared key as well as the two tunnel Public IP addresses). Remember, each Site to Site VPN comes with two tunnels.
Testing your Site to Site VPN Connection
- On the dashboard, choose Launch Instance.
- On the Choose an Amazon Machine Image (AMI) page, choose an AMI, and then choose Select.
- Choose an instance type, and then choose Next: Configure Instance Details.
- On the Configure Instance Details page, for Network, select your VPC. For Subnet, select your subnet. Choose Next until you reach the Configure Security Group page.
- Select the Select an existing security group option, and then select the group that you configured earlier. Choose Review and Launch.
- Review the settings that you’ve chosen. Make any changes that you need, and then choose Launch to select a key pair and launch the instance.
- After the instance is running, get its private IP address (for example,
10.0.0.4). The Amazon EC2 console displays the address as part of the instance’s details. - From a computer in your network that is behind the customer gateway device, use the
pingcommand with the instance’s private IP address. A successful response is similar to the following:ping 172.X.X.X
NOTE: Spin up a free tier EC2 instance and edit the Security Groups to allow ICMP traffic (Ping Traffic) from your on prem CIDR Block.
To Avoid Overlapping CIDR Blocks on the AWS sIde
The best solution is to avoid using 10.0.0.0/24 or 192.168.0.0/24 as private LAN network addresses. Instead, use something that has a lower probability of being used in a WiFi cafe, airport, or hotel where you might expect to connect from remotely.
The best candidates are subnets in the middle of the vast 10.0.0.0/8 netblock (for example 10.66.77.0/24).
Need an experienced AWS/GCP/Azure Professional to help out with your Public Cloud Strategy? Set up a time with Anuj Varma.
Anuj holds professional certifications in Google Cloud, AWS as well as certifications in Docker and App Performance Tools such as New Relic. He specializes in Cloud Security, Data Encryption and Container Technologies.
Anuj Varma – who has written 1263 posts on Anuj Varma, Hands-On Technology Architect, Clean Air Activist.
Leave a Reply